")
**Warning – Please do not follow this tutorial, the Pets patch (along with several patches after) has made this tutorial outdated! Will update the tutorial when I can.**
Create a Mod – Custom Trait (Part I – The Basics) will show you the basics of making a custom trait! Before you begin, you will need:
Mod Constructor by Zerbu
Preparing Mod Constructor Tutorial (Optional) – Not needed if you already know how to install the program.
NOTE – Mod Constructor V2 only supports up to the Vampires GP. However, Zerbu is working on a new version. In the meantime, I will show you how to manually add resources from packs released after Vampires in later tutorials.
Creating the Mod
For this tutorial, I’m going to create a Brave trait. However, you can still follow along to make your own trait.
-
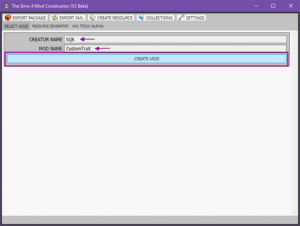
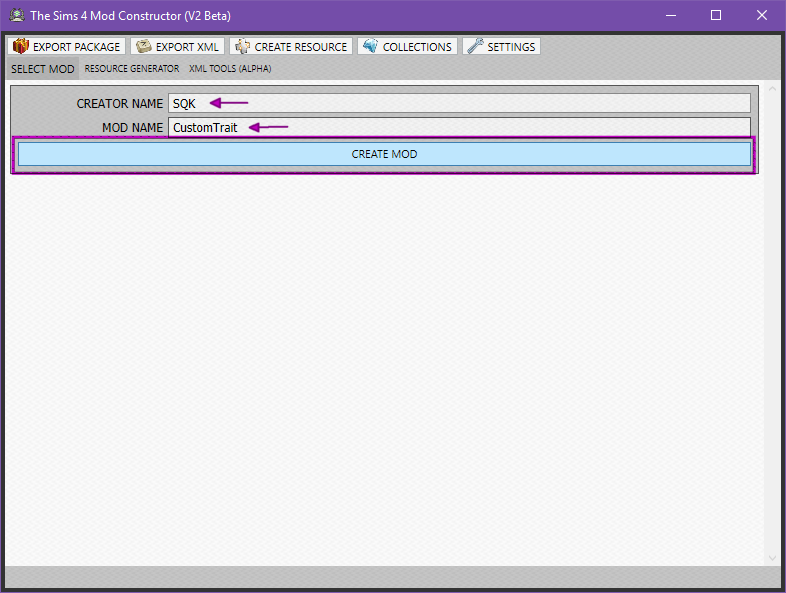
Open Mod Constructor, type in your Creator Name and the Mod Name, then click Create Mod:
-
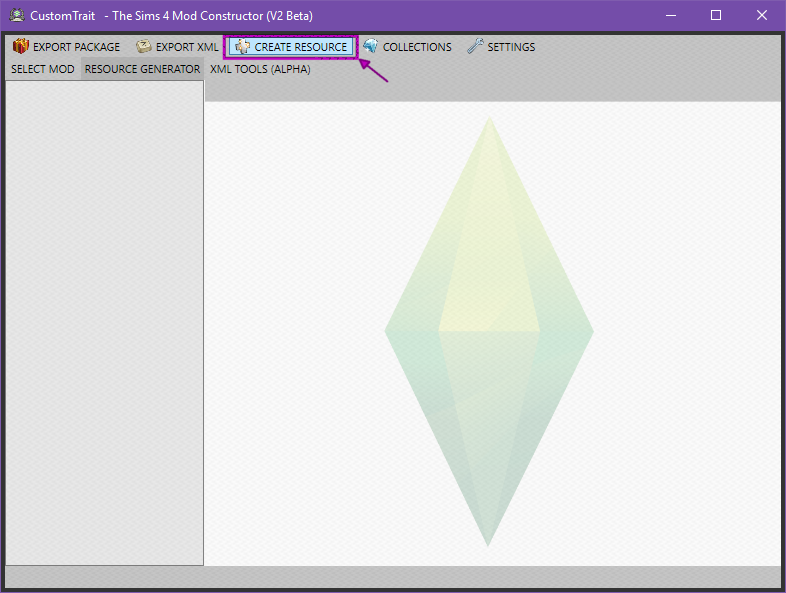
Click Create Resource:

-
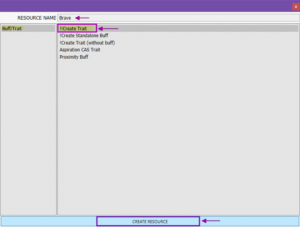
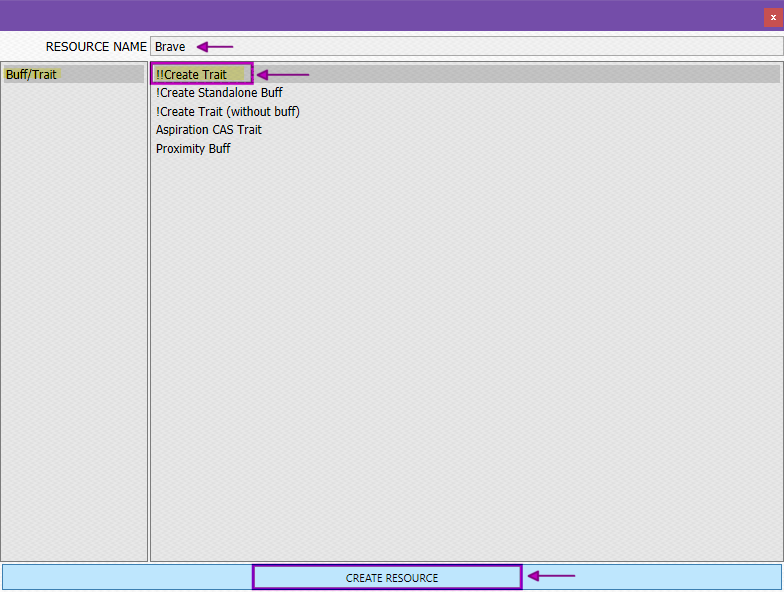
Enter a Resource name (for this trait I entered: Brave), click on !!Create Trait, then click Create Resource:
NOTE – In Settings you can set your experience level for the tool. For this tutorial I’m keeping it at the default, which is Absolute Beginner. You’ll see the differences in upcoming tutorials.
Editing the Trait
Trait > Info
Most of these are pretty self-explanatory, I’ll still go over them though.
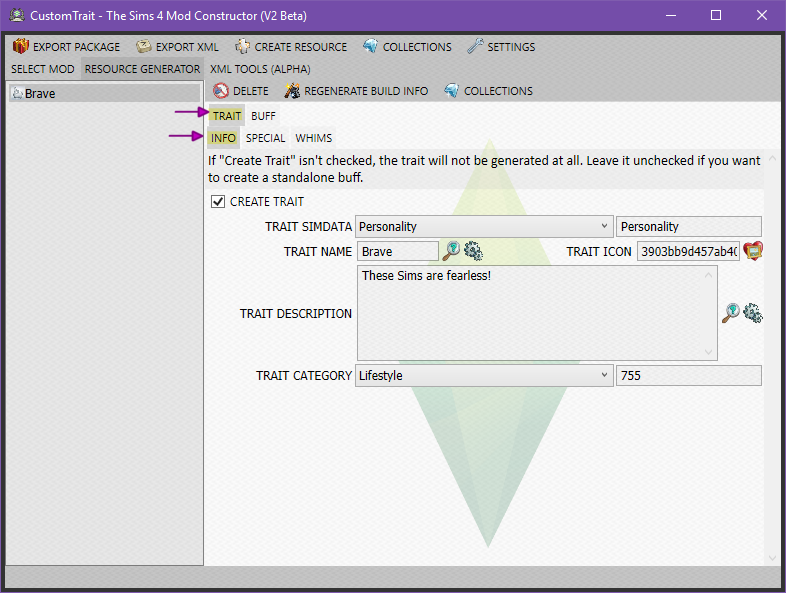
- Trait-Simdata – Select the trait type:
- Aspiration CAS Trait – You receive these traits when you choose a certain aspiration type (ex – Knowledge Aspiration Sims get the Quick Learner trait).
- Gameplay – Traits from the Reward Store as well as Traits from completing Aspirations.
- Hidden – Hidden Traits that define a Sim, including temporary ones (ex – isPregnant, Been Kissed, Right Handed, etc).
- Personality – Traits that you choose for your Sims in CAS.
- Walk Style – Walk style traits such as Snooty, Goofy, Tough, etc.
- Trait-Name – Enter your trait name in this box (if it’s not already there).
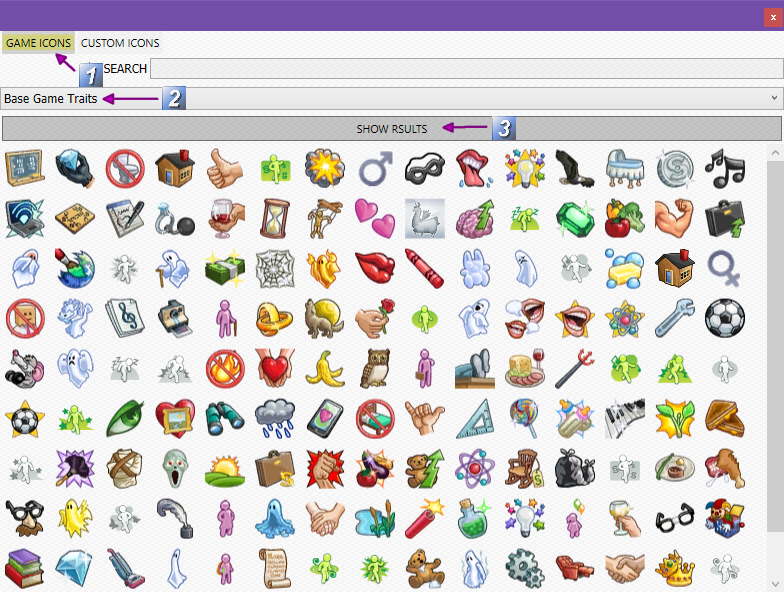
- Trait-Icon – Click on the Select Icon button (the heart), a new window will appear:
- Click on Game Icons
- Select from Base Game Balloons, Buffs, or Traits
- Click Show Results
- Choose an icon:
- Trait-Description – Description for the custom trait (I’m sure you’re more creative than I was lol).
- Trait-Category – Select your trait category (Emotional, Hobbies, Lifestyle, or Social).
Trait > Special
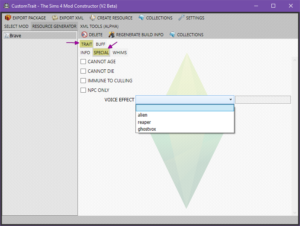
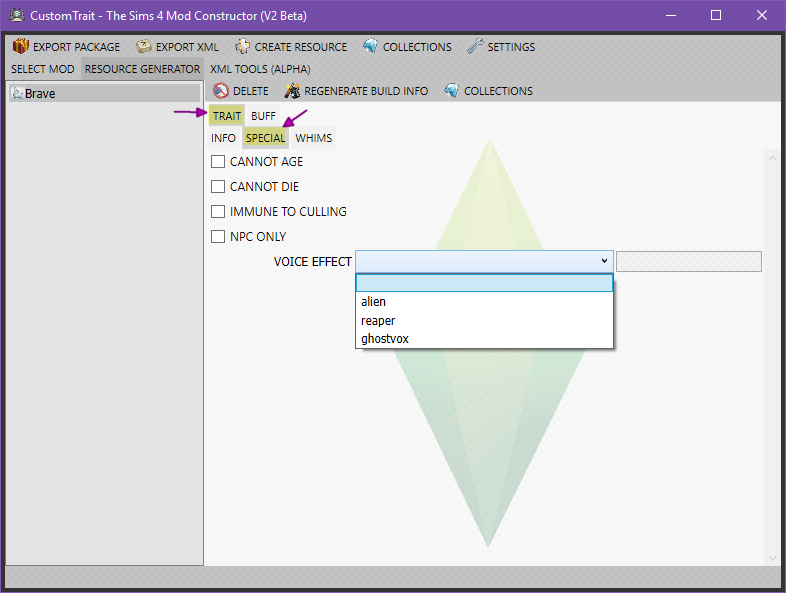
- Select any special options to apply to Sims with this trait:
- Cannot Age
- Cannot Die
- Immune to Culling
- NPC Only.
- You can even select their Voice Effect: alien, grim reaper, or ghost.
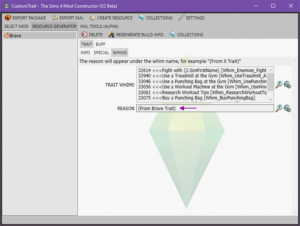
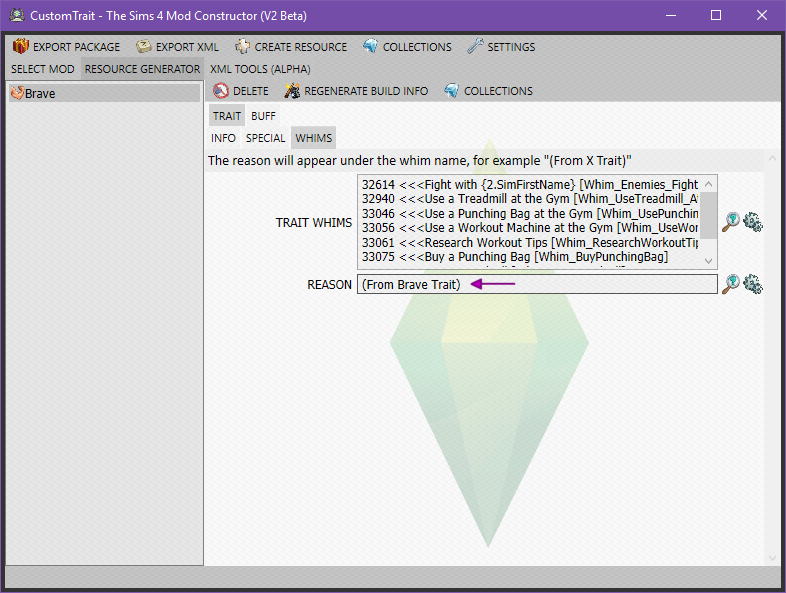
Trait > Whims
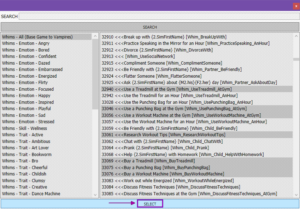
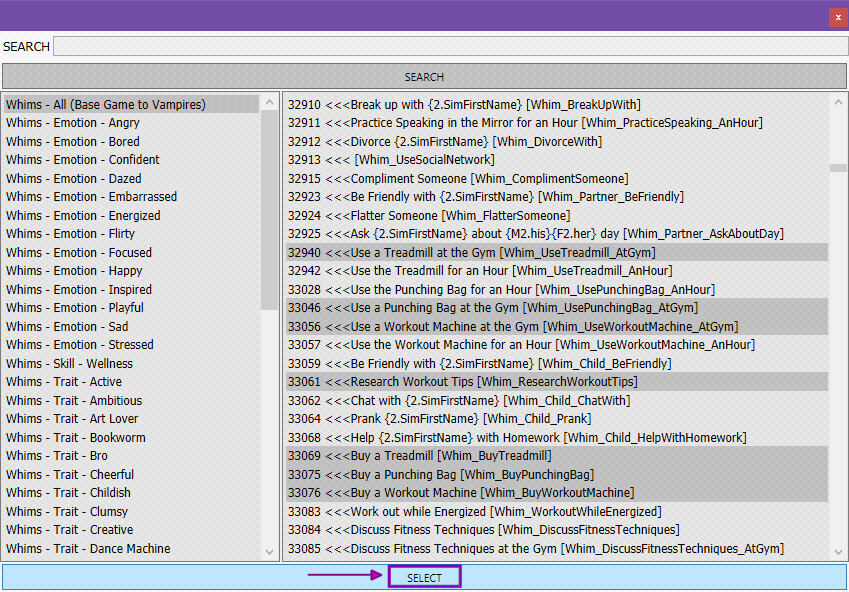
- Click Browse:
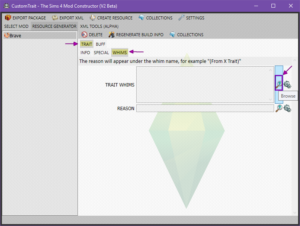
- Click on the Whims you want for this trait (you can select multiples), then click Select:
- In the Reason box, type in: (From your trait name Trait)

Editing the Core Buff
You’ll need a core buff for your trait if you want to set Autonomy, Decay Rates, etc.
Buff > Info
This is the core buff for the custom trait. Set this to either a Hidden buff (which most of them are) or a Visible buff. I recommend making it a Hidden buff because we can add Occasional buffs later.
Hidden Core Buff
This will be a hidden permanent buff:
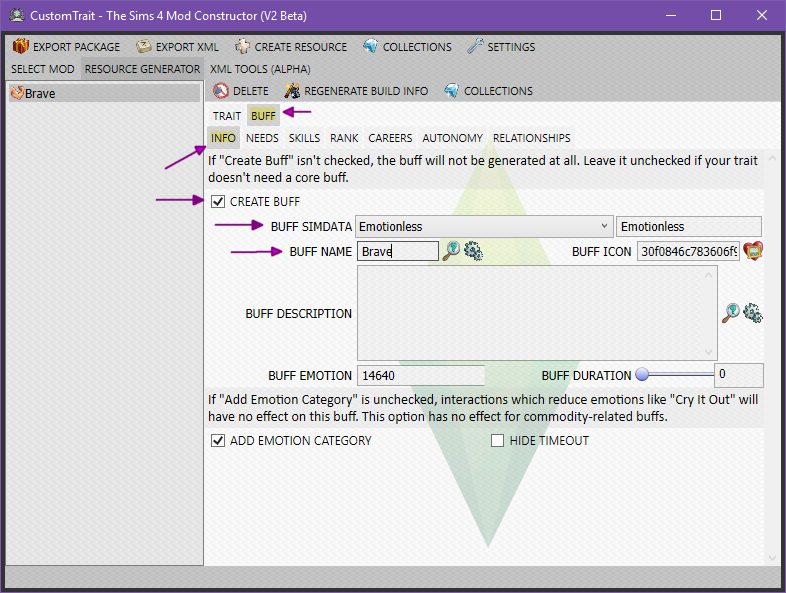
- Create Buff – Checked.
- Buff-Simdata – Set to Emotionless.
- Buff-Name – Enter the name of your buff (same name as your Trait is fine).
- Feel free to ignore everything else in this tab, they’re not needed for hidden core buffs!
Visible Core Buff
This will be a permanent trait buff, you will always see it! Therefore, Buff-Duration and Add Emotion Category option will have no effect on it:

- Create Buff – Checked.
- Buff-Simdata – Select Emotion Weight (the higher it’s set, the stronger effect the emotion has).
- Buff-Name – Enter the name of your buff.
- Buff-Icon – Select the icon for your buff (just as you did for the Trait-Icon above).
- Buff-Description – Enter a description for your buff.
- Buff-Emotion – Enter the ID of the Emotion for your buff, ID’s shown here:
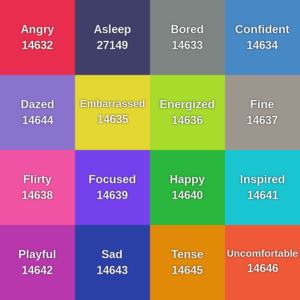 Note – It reverts back to the default emotion ID if copied and pasted when moving to another tab. So, you have to type it in.
 - Buff-Duration – No effect for core buffs. For normal buffs this is how long the buff will last.
- Add Emotion Category – No effect for core buffs. For normal buffs, uncheck if you don’t want interactions like Try to Calm Down to reduce it.
- Hide Timeout – No effect for core buffs. For normal buffs, check this if you don’t want to see how long the buff has left.
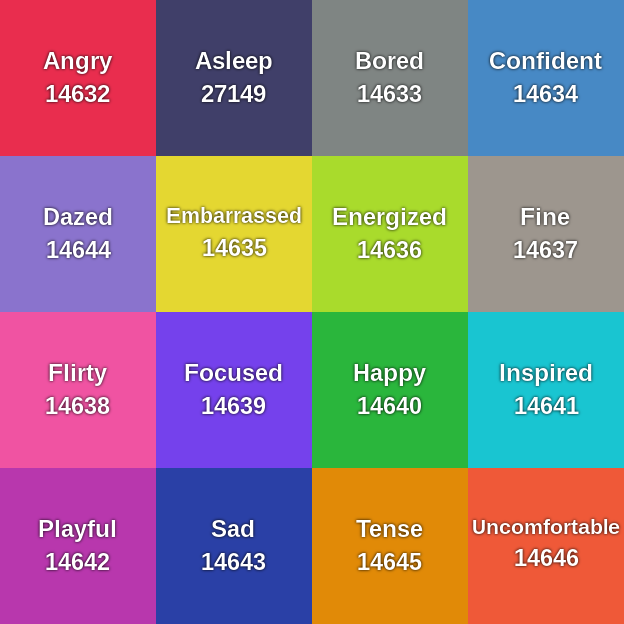
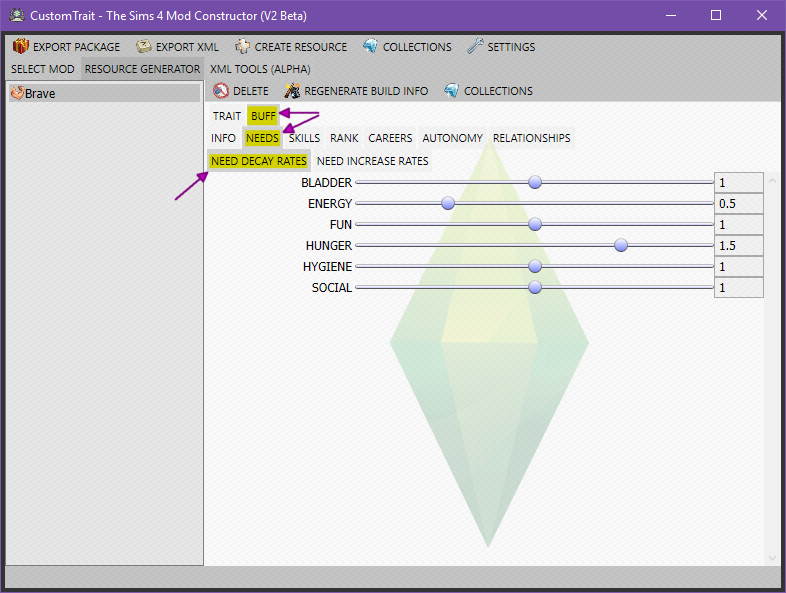
Buff > Needs
- Need Decay Rates – Increase to make them decay faster, decrease to make them decay slower. Set to 0 for no decay:

- Need Increase Rates – Increase to make them fill faster, decrease to make them fill slower while doing interactions that fill them:

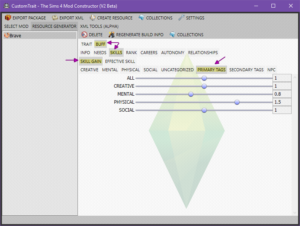
Buff > Skills
- Skill Gain – Increase to learn the skill quicker, decrease to learn the skill slower:

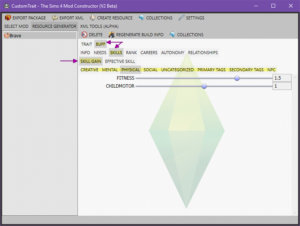


- Instead of doing them individually, you can set them by TAGS. Here, Brave Sims will learn Physical skills faster than normal, however they will take longer to learn Mental skills:
- Effective Skill – Changes the effect of actions related to a skill (ex – Bartending – higher quality drinks, Cooking – higher quality meals, Painting – higher quality paintings, etc):
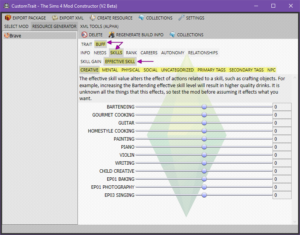
Note – As it says, however, you should test before assuming it affects what you want it to.


Buff > Rank
![]()
- Only change this if your trait is for Vampires only, otherwise you’ll get error logs.
NOTE – Do not confuse this with the Vampire Lore skill (not that I’ve done this or anything *whistles*), the Vampire Lore skill is in the Skills tab under Uncategorized.
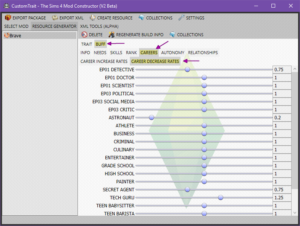
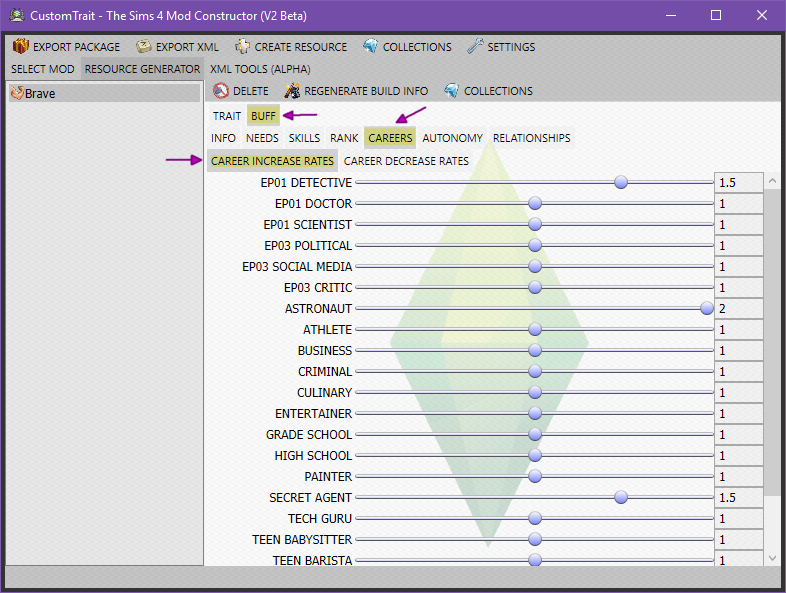
Buff > Careers
- Career Increase Rates – Increase for faster career progression, decrease for slower career progression:

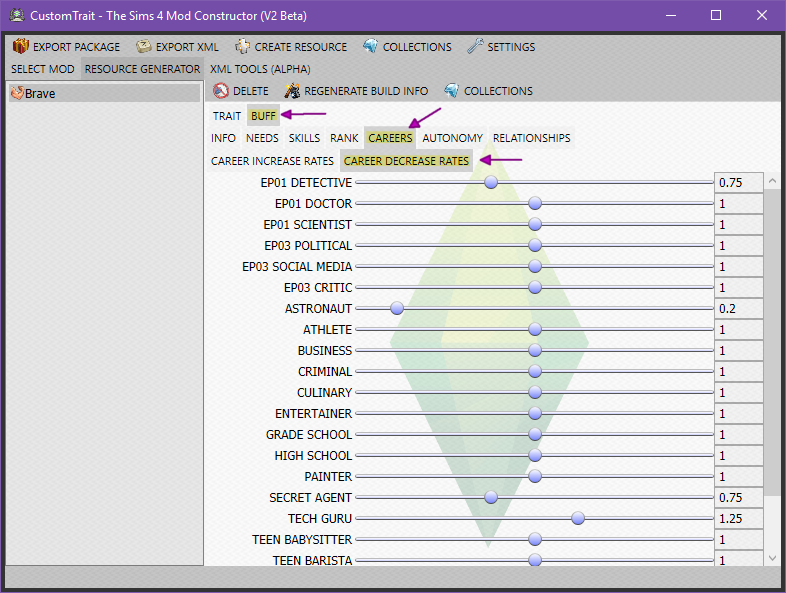
- Career Decrease Rates – This affects how much of a performance loss you take (ex – missing work, chance cards, etc). Increase for a greater performance loss, decrease for a lesser performance loss:
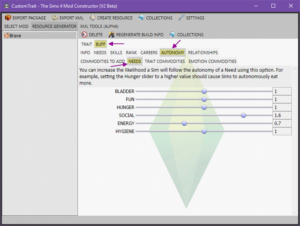
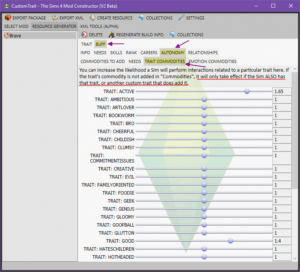
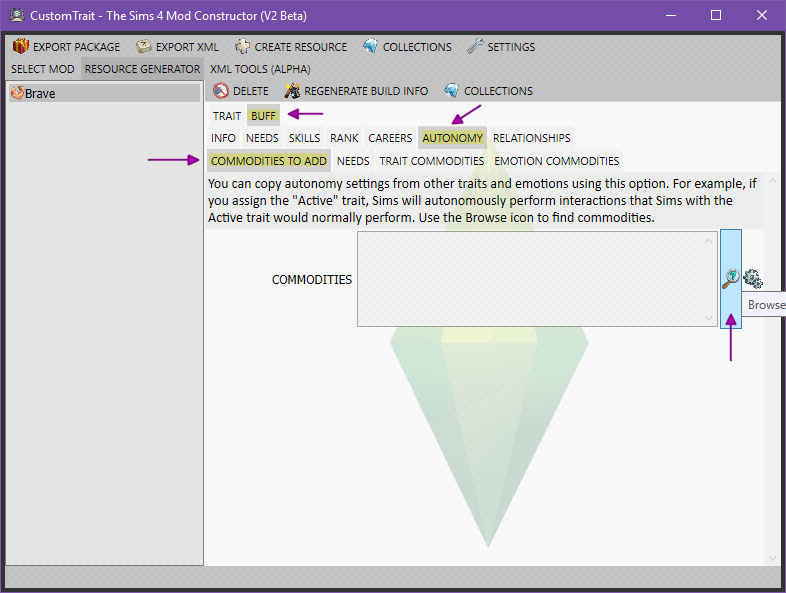
Buff > Autonomy
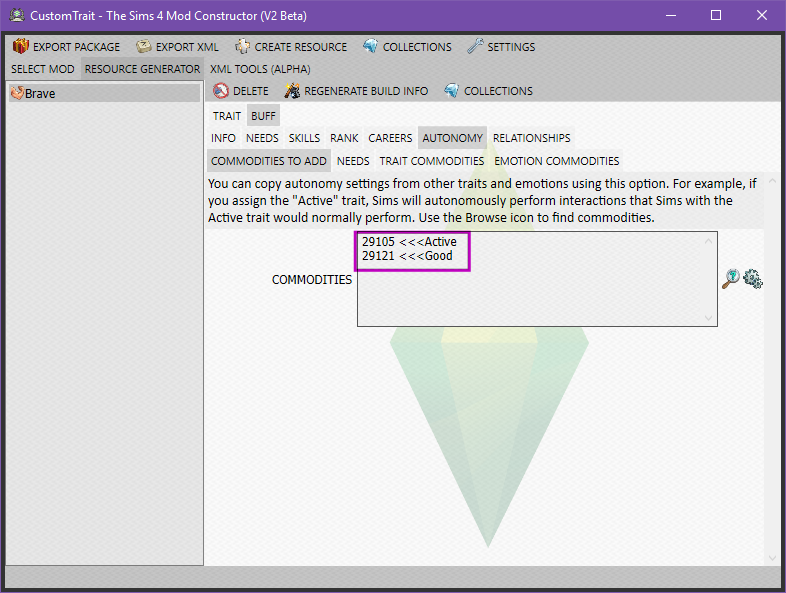
- Commodities To Add – Choose from traits, emotions, and needs that you want your Sims to more likely do autonomously.
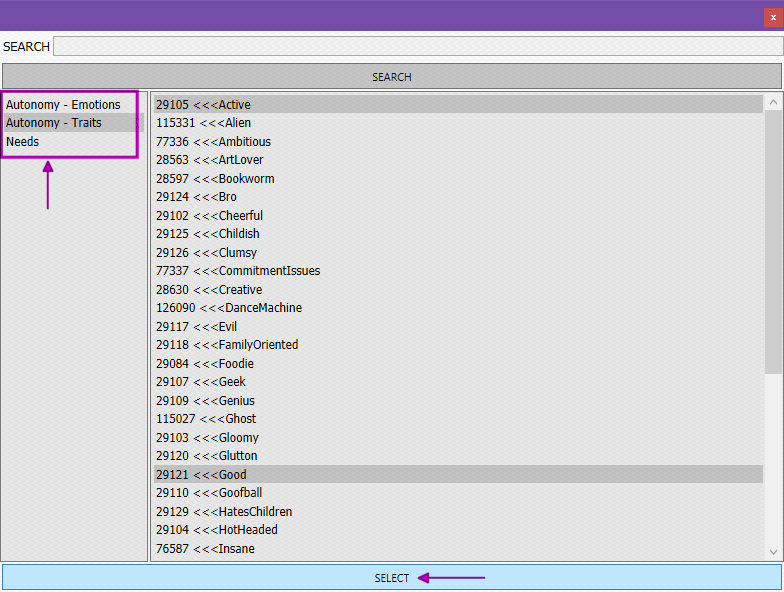
- Click Browse:

- Select which traits, emotions, and/or needs that you want your Sims to do autonomously, then click Select:


- Click Browse:
- Needs – Adjust the autonomy of a Need. Increase for them to more likely follow, decrease for them to less likely follow:
- Trait Commodities – Only adjust the traits here that you added in Commodities To Add, any others that you adjust won’t do anything unless they also have that trait. Increase for them to more likely follow, decrease for them to less likely follow:
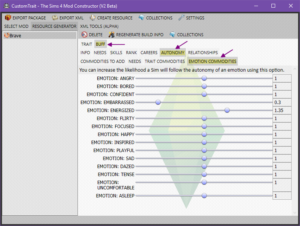
- Emotion Commodities – Adjust the autonomy likelihood for an Emotion. Increase for them to more likely follow, decrease for them to less likely follow:


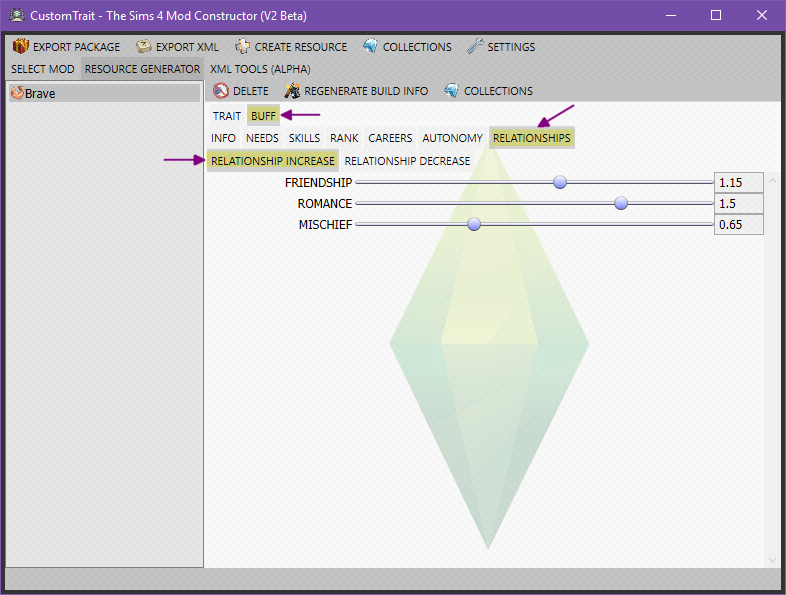
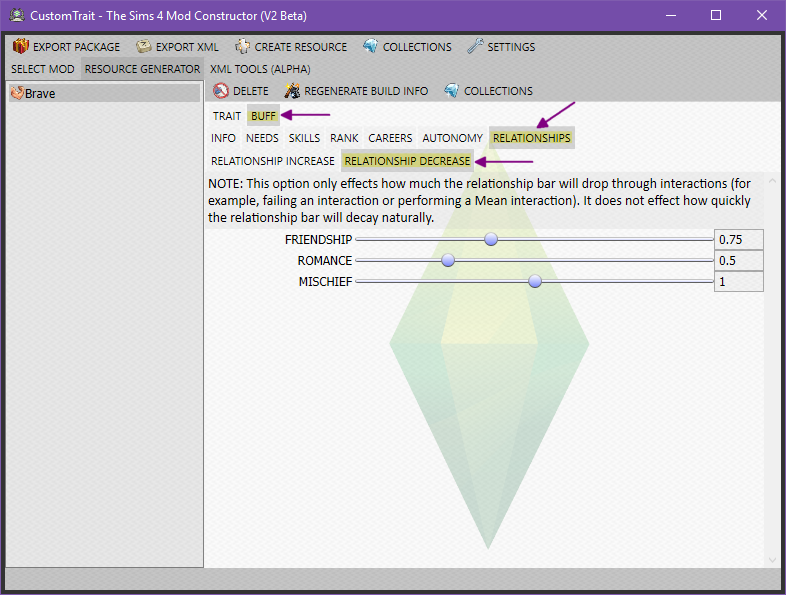
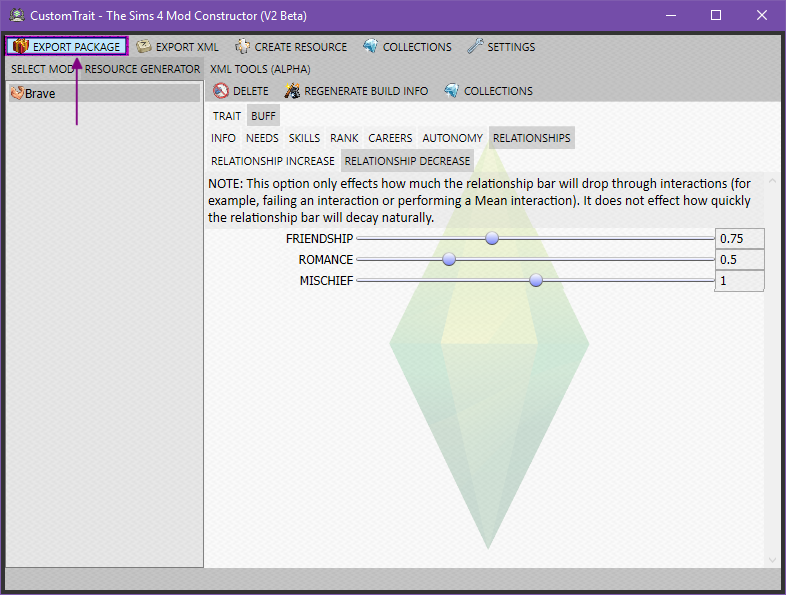
Buff > Relationships
- Relationship Increase – Increase to make it easier to build relationships, decrease to make it harder to build relationships:

- Relationship Decrease – Increase for bigger relationship drops, decrease for smaller relationship drops:
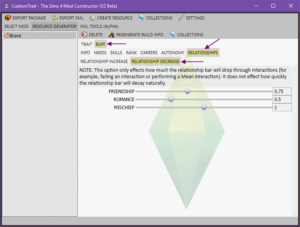
Note – As it says “it does not affect natural decay.”
♦♦ If you want to add Occasional Buffs, Continuous Buffs, Proximity Buffs, and/or Broadcasters to your custom trait, see Custom Trait (Part II) – Adding Buffs ♦♦
Export
Now that you’ve completed your custom trait, go through and double-check all of your edits. If you’re happy with it as it is, then all you have to do is export it and add it to your game:
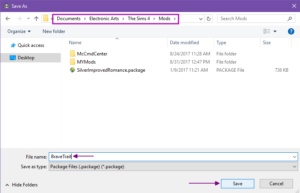
- Click Export Package:

- Navigate to your Mods folder, enter your mod name in the File name box, click Save:
- Test and enjoy your new trait!!

If you have any questions or need help with this or any of my other tutorials, please feel free to email me!


")